Continuously deploying (and backing up) my blog
As you should know if you scroll to the bottom of my pages, my blog is
"Proudly published with Docker, Ghost and ABC Theme on my Raspberry Pi"
And as you should also know by now, I am pretty much lazy.
If I won the award for laziness, I would send somebody to pick it up for me.
Problem
My Raspberry Pi is hanging on the floor, the blog being served from an SD card (ouch!) and the whole thing is within reach of my iRobot Roomba Vacuum, which managed to bring down my blog several times already :)
This seems like a recipe for failure!
But, instead of mounting an external disk and serving my blog from it, or worse moving my Raspberry Pi away from the Roomba, in this blog post we will setup our Continuous deployment of the blog and favor high availability and resilience use cases (and laziness)!
What we will do
To do that, we will:
- Build a docker image for the blog without it's data
- Prepare the data and load it as a Docker volume
- Push the volume over to an S3 bucket, a Dropbox folder or a google drive one
- Setup dyndns client for Namecheap (this is where I bought my domain name)
Once we have these three elements, upgrading, deploying, or replicating our blog is a matter of a simple Jenkins job or a shell script.
Ok. Let's go!
Build a Docker image for the blog (without the data)
Note that for the sake of using my rather old Raspberry Pi to serve my blog, I am basing my Docker image on an already package image done by @alexellisuk for an ARM V6. If you have a different architecture for your Pi, (or x86), you can find other images. Check out his Git repo here: https://github.com/alexellis/ghost-on-docker
I am customizing a bit to account for my domain name, and replacing bcryptjs by bcrypt, as the later is much more quicker. (Especially on Rpi)
FROM alexellis2/ghost-armv6:0.11.2

RUN sed -i s/my-ghost-blog.com/jmkhael.io/g config.js
RUN npm install bcrypt
RUN sed -i "s/require('bcryptjs')/require('bcrypt')/" core/server/models/user.js
You can also just clone and adapt my repo to suit your needs:
git clone https://github.com/jmkhael/blog
pushd blog/jmkhael.io
Time to build the image:
docker build -t blog-0-11-2 .
This should have prepared a docker image, which we will be using below.
Prepare the data and load it as a Docker volume
Let's prepare a folder where the data will be stored on disk:
mkdir -p /home/pi/google-drive/ghost-content/
It is time to run our Ghost blog in a Docker container:
docker run --name blog-0-11-2 \
   -d -p 80:2368 \
   -v /home/pi/google-drive/ghost-content/:/var/www/ghost/content/ \
   blog-0-11-2
Of course, you know by now that I prefer to launch everything as a Service in a Docker Swarm ;)
Wait a (rather big) moment for it to startup, create the schemas and all that.
You can now login to the blog at http://localhost.
(substitute localhost with the Raspberry Pi or the machine name/or ip where you started the container)
Push the volume over to google drive
We will be using drive tool from https://github.com/odeke-em/drive.
installation on a Raspberry Pi
Make sure to chose from the releases page https://github.com/odeke-em/drive/releases, the latest version which works for your architecture:
Given that I am running on an ARM v6 (to get yours, execute a uname -a):
cd /tmp
wget wget https://github.com/odeke-em/drive/releases/download/v0.3.8/drive_armv6
chmod +x drive-armv6
sudo cp drive-armv6 /usr/local/bin/gdrive
cd ~
gdrive version
Init gdrive
Navigate to the folder in which you want to store google drive root, and call gdrive init:
cd /home/pi/google-drive/ghost-content/
gdrive init
This will ask you to visit a url to grant the app an OAuth token. Follow that; then paste the token on the command line and press Enter.
Afterwards you can push the folder using:
gdrive push -quiet /home/pi/google-drive/ghost-content/
You can also pull it when you need to clone it or replicate on another machine:
gdrive pull -quiet /home/pi/google-drive/ghost-content/
That great. But not enough! We can go further.
Let's write a small shell script to backup the drive, and put it in a cron:
/home/pi/blog/backup.sh
#!/bin/bash
echo Starting backup...
/usr/local/bin/gdrive \
    push -no-prompt -exclude-ops \
    delete /home/pi/google-drive/ghost-content
echo Done.
Now give execution rights and add it to a cron:
chmod a+x /home/pi/blog/backup.sh

crontab -e
Then add the below line to the end:
30 * * * * bash /home/pi/blog/backup.sh > /tmp/backup.txt
To do the same into an S3 bucket, or a Dropbox folder you can follow my other guides.
Setup dyndns client for namecheap
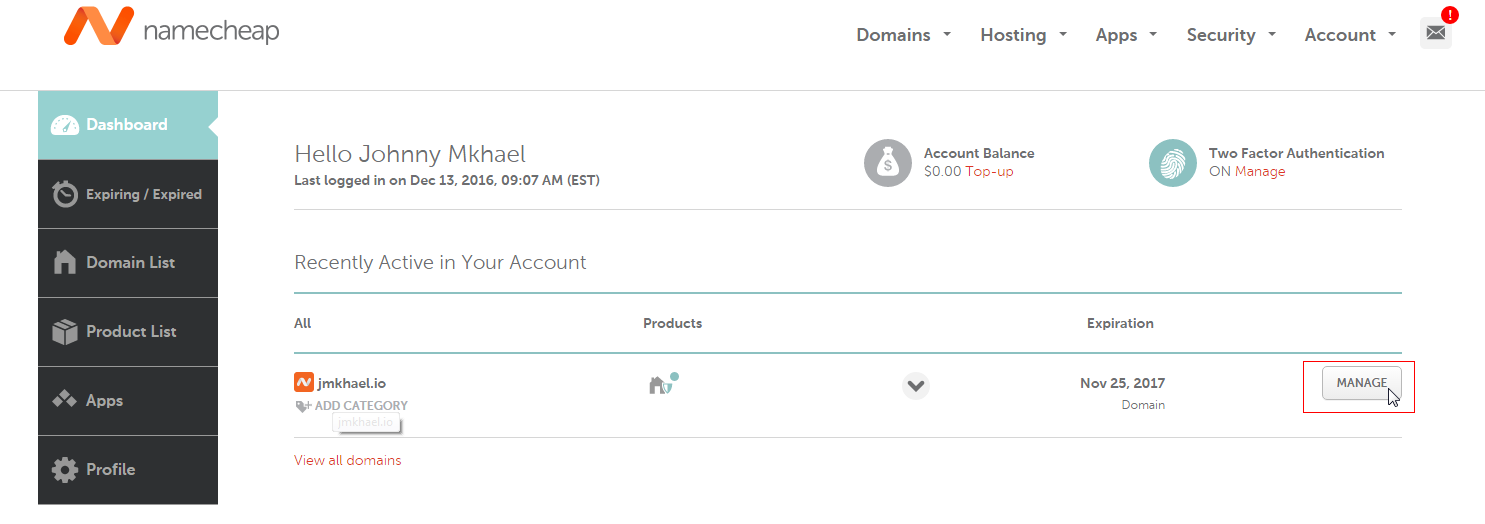
For the below section, you will need to buy a Namecheap domain (for as little as few dollars). Once done, you need to login and retrieve dyndns password to be used below.
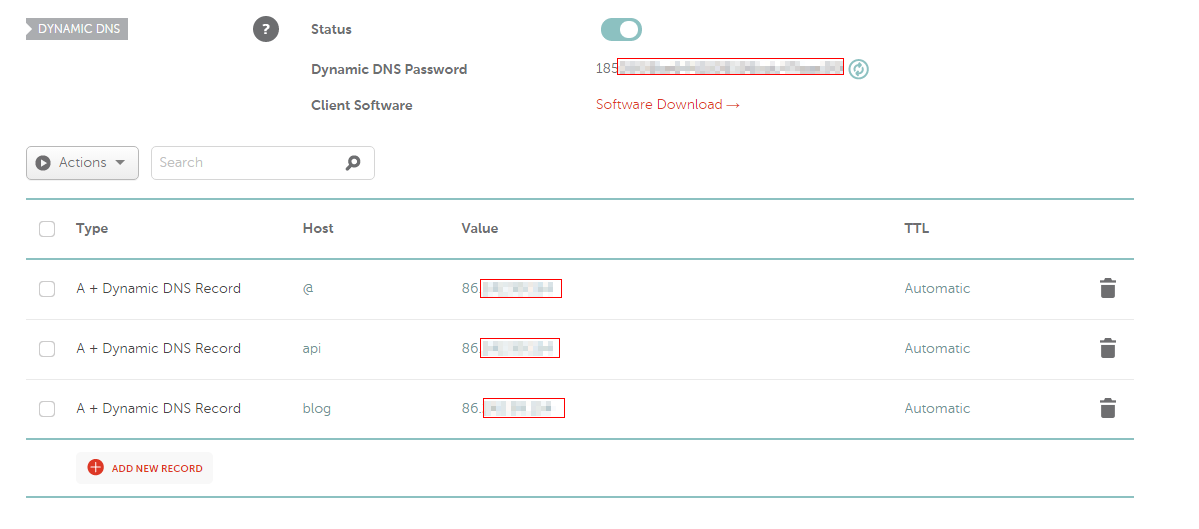
Check the below screenshots to see where to do that:
We will also be using ddclient to update the DNS entry for the domain.
sudo nano /etc/ddclient.conf
The login is your domain name and the password is retrieved from the second picture from the field Dynamic DNS Password
# Configuration file for ddclient generated by debconf
#
# /etc/ddclient.conf
use=web, web=dynamicdns.park-your-domain.com/getip
daemon=3600
protocol=namecheap
server=dynamicdns.park-your-domain.com
login=jmkhael.io
password='<my namecheap password goes here>'
@, www, api, blog
Force a ddclient update then make sure to restart the service:
sudo ddclient --force
sudo service ddclient restart
Put it in a crontab, so we update namecheap each and every while:
sudo crontab -e
then add the below line to the end and save:
45 04 * * * /usr/sbin/ddclient --force
wait a while, and navigate to your domain name and see your blog!
Some useful links for dealing with ddclient and Namecheap
http://workshop.botter.ventures/2014/02/02/how-to-use-ddclient-with-namecheap/
https://help.ubuntu.com/community/DynamicDNS
Setup reverse proxy and SSL (Optional)
What is coming next
In next blog posts, I might document how to:
- Setup ssl on reverse proxy
- Healthcheck/monitor the blog externally (uptime monitoring or something)